AS this is year 2 in diminished socializing < Covid Pandemic still doing its thing>, we did not have a big birthday party, but my MUSE always inspires me to create something fun for him.
This year, Gregorian calendar 2021, I decided to use the opportunity to make a small version of a Cthulhu cake… so I could decide if next year I will attempt a larger one for guests if we are able to enjoy the company of others then.
FYI – the Mountain will be shared later today with nearby neighbours so we don’t eat it all!
I apologize for the “jump to recipe” folk – you’ll have to scroll!
I’ll divide it into the 3 main segments and tackle each on it’s own, so you can tell by photos where I’m at in the journey!
- WINGS
- Cthulhu
- Black Forest Mountain Cake
WINGS:
Recipe:
- ½ cup granulated sugar
- ½ cup water
- ¼ tsp cream of tartar
- food colouring
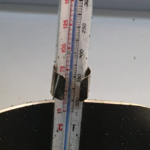
Put the sugar, water and cream of tartar into a pot and heat on medium heat, stirring only until the sugar dissolves. Bring to a boil and insert a candy thermometer.
No stirring now – let it reach 300 degrees or hard candy stage.
Remove from heat and quickly stir in food colouring. Pour into greased mold and let harden for 30-35 minutes.
Remove from mold while still a bit warm in order to shape the wings a bit – stick it into a cup or something to keep it upright and place in the fridge to finish setting.
Lessons learned:
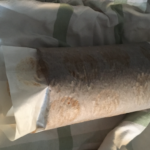
- I thought if I made this with brown sugar it would be cool and have a different flavour – I think I over cooked it . I used parchment paper with a pattern under it to try to create the wing shape and it was rough and too large – then they cracked and I turned it into a creepy bat…
- at the last minute I rushed to create the wings that I did use for the cake
- positives: the stick helped, the foil mold was a better size, and they looked very cool with the texture created by the foil.
- negatives: I did not think to pre-grease the foil – that would have saved me 30 minutes of scraping foil off the back – but chemistry: sugar melts with water, so I alternatively scraped and ran water over the wings until I got all of the foil off. Also, I added the food colouring at the beginning and then had to clean up the bits of green sugar mix that bubbled up and out of the pot onto the stove …though it was easy to see…
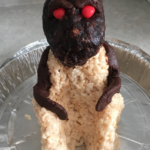
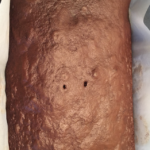
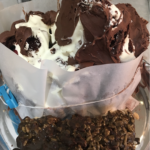
Cthulhu Figure:
Components:
-
Rice Krispie treats
-
Cake pop filling for head <optional>
-
Modeling chocolate
-
Faux Mirror Glaze
-
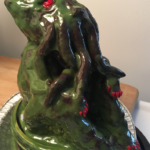
decorator’s icing , cinnamon hearts for red eyes and nails
Recipes:
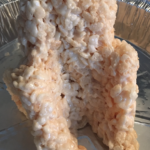
Rice Krispie treats – follow the directions on the cereal box – you’ll need marshmallows, butter/margarine, vanilla flavouring . I only needed a half recipe for this project. You can also use premise treats, but I find I have more control creating my shapes while it is still warm.
Helpful hint: Oil your hands with a neutral oil < veg oil> or your butter/ margarine to do the sculpting. also oil the surface you will put it on or use parchment or wax paper – it makes life easier.
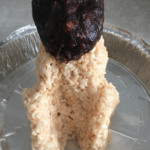
Cake pop filling head < you can just use more Rice Krispie treats to make the head> – I had leftover chocolate cake and butter cream icing from our anniversary, so thinking ahead, I had mixed the crumbled cake and frosting together, squished it into a ball, wrapped it in plastic and stuck it in the freezer.
I shaped roughly into the head and it stuck onto the body quite nicely with no toothpick/ stick needed.
NOTE: I also made a Rice Krispie treat small circular platform you’ll see in later pics, that I then cut in half and stacked, upon which the little guy would sit when assembly time came.
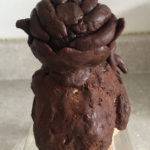
MODELLING CHOCOLATE:
Recipe:
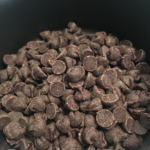
- 250 grams or 1 package chocolate chips < I used 50% cocoa/ dark chips>
- ¼ cup honey at room temperature
Melt the chips on the stove or microwave – careful not to over melt them. Remove from heat when they are almost all melted and stir until it is all melted.
Add the honey and stir until it reaches the texture of soft ice cream and is mostly dull. There may be some shiny streaks, and you don’t want to over mix.
Wrap it in plastic or parchment paper and set aside to cool to room temperature for at least 30 minutes.
When ready to start using it, knead it a bit to make sure all is nice and smooth then treat it like play dough or clay.
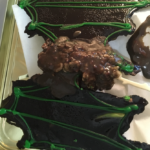
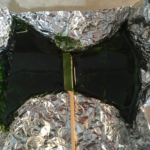
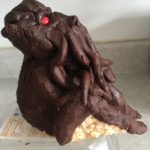
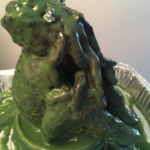
Here are some of the stages of creating Cthulhu that worked for me. I placed him on a small tin that would provide a good base for the mirror glaze pour, then into the freezer with him for at least 2 hours …

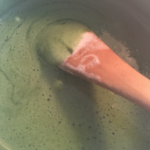
Faux Mirror Glaze by TAV
I looked online to find any mirror glaze recipes that did not require corn syrup or gelatine as I had neither. The vegan recipe I found did call for corn syrup and agar agar – which I also did not have.
What I did have was more marshmallows – guess what’s in marshmallows – gelatine and a lot of sugar! Also most called for sweetened condensed milk – but I had a can of evaporated milk open in the fridge so…
Many recipes also called for white chocolate to give a more opaque base that would show the colours more, and while I only had 50 grams left from a previous baking adventure, I figured sure… I experimented…
Recipe:
- ⅔ cup evaporated milk
- 8 large marshmallows
- 50 grams white chocolate chips
- Food colouring as desired
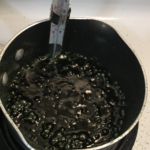
Heat milk and marshmallows over low heat to melt. Remove from heat and add in chocolate, and food colouring. Stir until all is melted.
Pour the glaze through a mesh sieve into a pouring container – I have a glass measuring cup that worked. This helps reduce the bubbles.
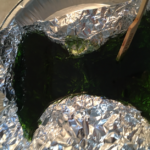
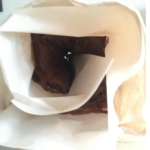
I took Cthulhu out of the freezer and placed him in a larger foil tray to catch the drips. I placed tiny foil pieces on the eyes to minimize the need to clear that out later -> it worked.
Because my glaze was fairly runny, it was very forgiving. I was able to keep scooping up the glaze from the tray and pour it back over the top of him, barely wasting any – which is a bonus! I used silicone pastry brush to get it into the crevices.
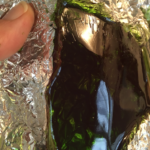
NOTE: the colour did change after 12 hours to a darker green – but that’s ok..
Decorator’s Icing:
I actually had some already from an XMAS cookie decorating kit that I had – so I will let you decide if you want to just make a simple icing sugar, butter/margarine/coconut oil mix and add food colouring, or do as you will for decorating – some folk have used sliced nuts for creating claws on food art…
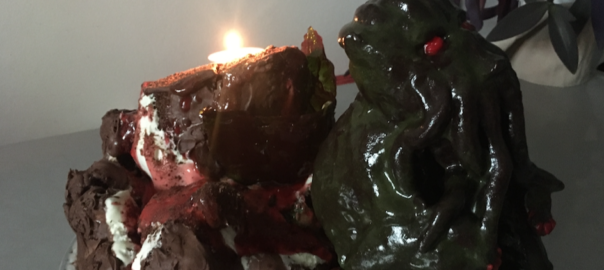
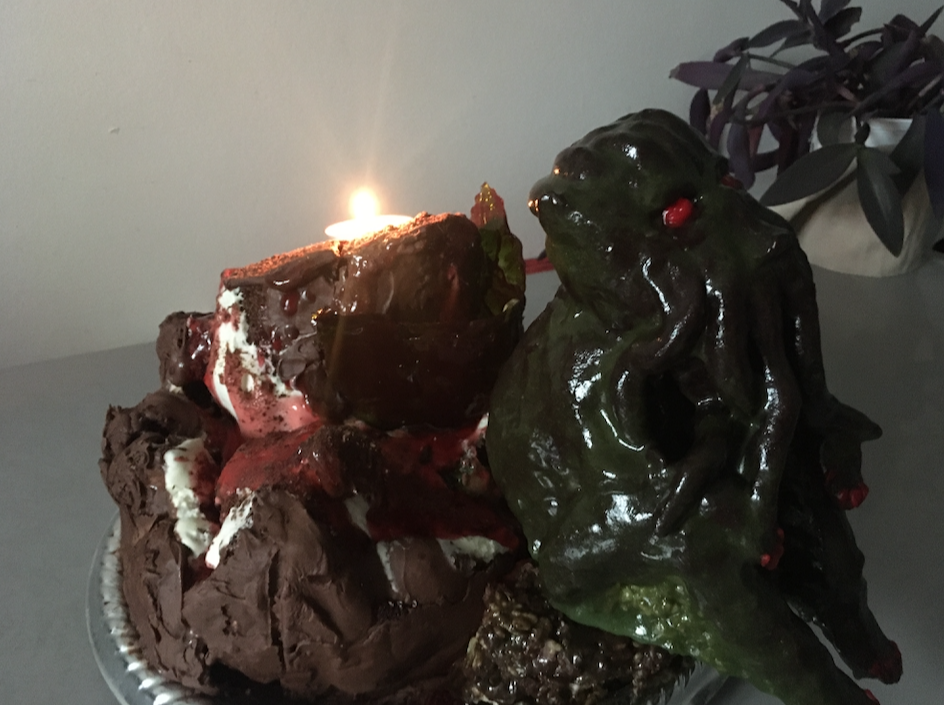
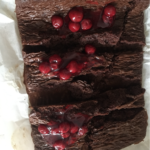
Black Forest Mountain Cake
Components:
- cake mix – yes – I use boxed mixes..
- whipping cream < 35% fat> – I do whip it up myself!
- Canned cherry pie filling – yes.
- buttercream icing – I made a half recipe of my Aqua Faba Swiss Buttercream and added ¼ cup cocoa to it.
- chocolate shavings from a dark chocolate bar
This year I wanted to try making a vertical roulade/ rolled cake to create the mountain – had to adapt at every stage as there were a few firsts for this…
Mix the cake according to directions and line a sheet pan < I had two smaller ones, so I used those> with parchment paper. Bake until done – it took about 15-18 minutes < but I make have over baked a bit>.
Immediately roll into logs using the parchment paper and a tea towel. Let cool completely in this shape.
Whip about 300 ml whipping cream to stiff ish peaks – I did not add any sugar as the rest of the cake has enough.
Unroll the cakes and kk- oh- they cracked something fierce.
Oh well – I knew I wanted to have peaks on my mountain so I cut the cakes diagonally, with the intention of rolling them from the high side to create a lowering around the mountain as it formed.
NOTE: Build the mountain on your serving tray. Make sure there is room in your fridge for the tray…

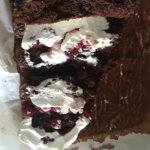
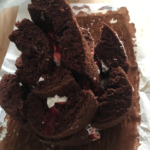
I spread some cherries and whipping cream on the larger of the two sheet cakes and started rolling them up. Since it had cracked, it ended up working better to build it by applying one segment at a time, and choosing the pieces based on what I liked the look of…putting cherries* and whipping cream on each piece to as I stuck it to the side of the growing mountain. I added a bit more whipping cream like snow along the tops of the pieces and in between as needed.
*save some cherries and most of the pie filling liquid for finishing the cake later…
Once I had all the pieces on the cake, I stuck it into the fridge to help it set, while I made the buttercream.
Aqua Faba chocolate Swiss Buttercream < ½ recipe>
- ¾ cup Aqua faba < strained juice from a can of or your own baked chick peas or mixed beans >
- ½ cup granulated sugar
- ¼ tsp cream of tartar
- 1 cup icing sugar
- ¼ cup cocoa powder
- ¼ cup softened butter or shortening
- ½ tsp vanilla extract
Mix aqua faba and sugar in a pot and bring to a boil, stirring occasionally. Boil for 5 minutes. Remove from heat and pour into a mixing bowl, letting it cool completely.
Whip it to stiff peaks, and add in the cream of tartar. This can take 15 minutes – bear with it!
Mix the cocoa powder with the ciocng sugar and add that to the meringue. Continue whipping and gradually add the softened butter or shortening, adding the vanilla last.
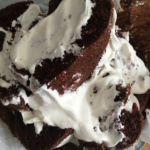
Bring the cake out and frost the outer edges or wherever you feel like to give it a nice coat/ look you want.
NOTE: I found that using a metal knife dipped in water helped it go on smoothly.
Use some frosting to cover the seat/platform later or if there was any faux glaze left, mix it and the frosting together for a lovely goo to cover the seat. Place it where it will allow room for the figure to sit safely beside the mountain.
The cake being erratic in construction needed some support, so I tied sheets of parchment around the outer edges and put it back in the fridge for overnight.
Assembly:
Ok – Cake comes out – gently peel back the parchment support and start adding the rest of the cherry pie filling as lava over the surface of the Mountain. Use the chocolate shavings to finish off the look of ash on the mountain.
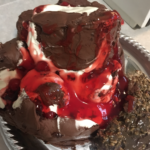

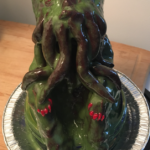
Check placement of platform/seat and stick wings into cake approximately where it will line up with the Cthulhu figure’s back.
Gently lift him and place onto the seat, and adjust the wings to rest against his back – I was not able to get this to quite work the way I wanted – but lessons learned for future adventures!
This worked on his own before he sat by the Black Forest Mountain…
Place candles as you like and light em up!
And enjoy!!!